Kotlin QuickStart
Solwave Kotlin Beta is Open Source 🎉.
You can now contribute to the SDK. Reach out to our team through Support to help you setup.
Pre-requisites
To get started, make sure you have the necessary tools and devices set up.
Emulator or Mobile Device (used to test the app)
Obtain Your API Key
Visit our Dashboard to acquire your unique
API_KEY. Not sure how to get started? Follow our guide for step-by-step instructions on obtaining your API key.Firebase Configuration
Get the Firebase configuration file for your project. This step is crucial for enabling advanced features and functionalities within the Solwave SDK. For assistance, follow the steps mentioned and get and download the Firebase Configuration file. Also it is important to enable Firebase Authentication for Google Sign In and re-download
google-services.jsonfile.
Setup
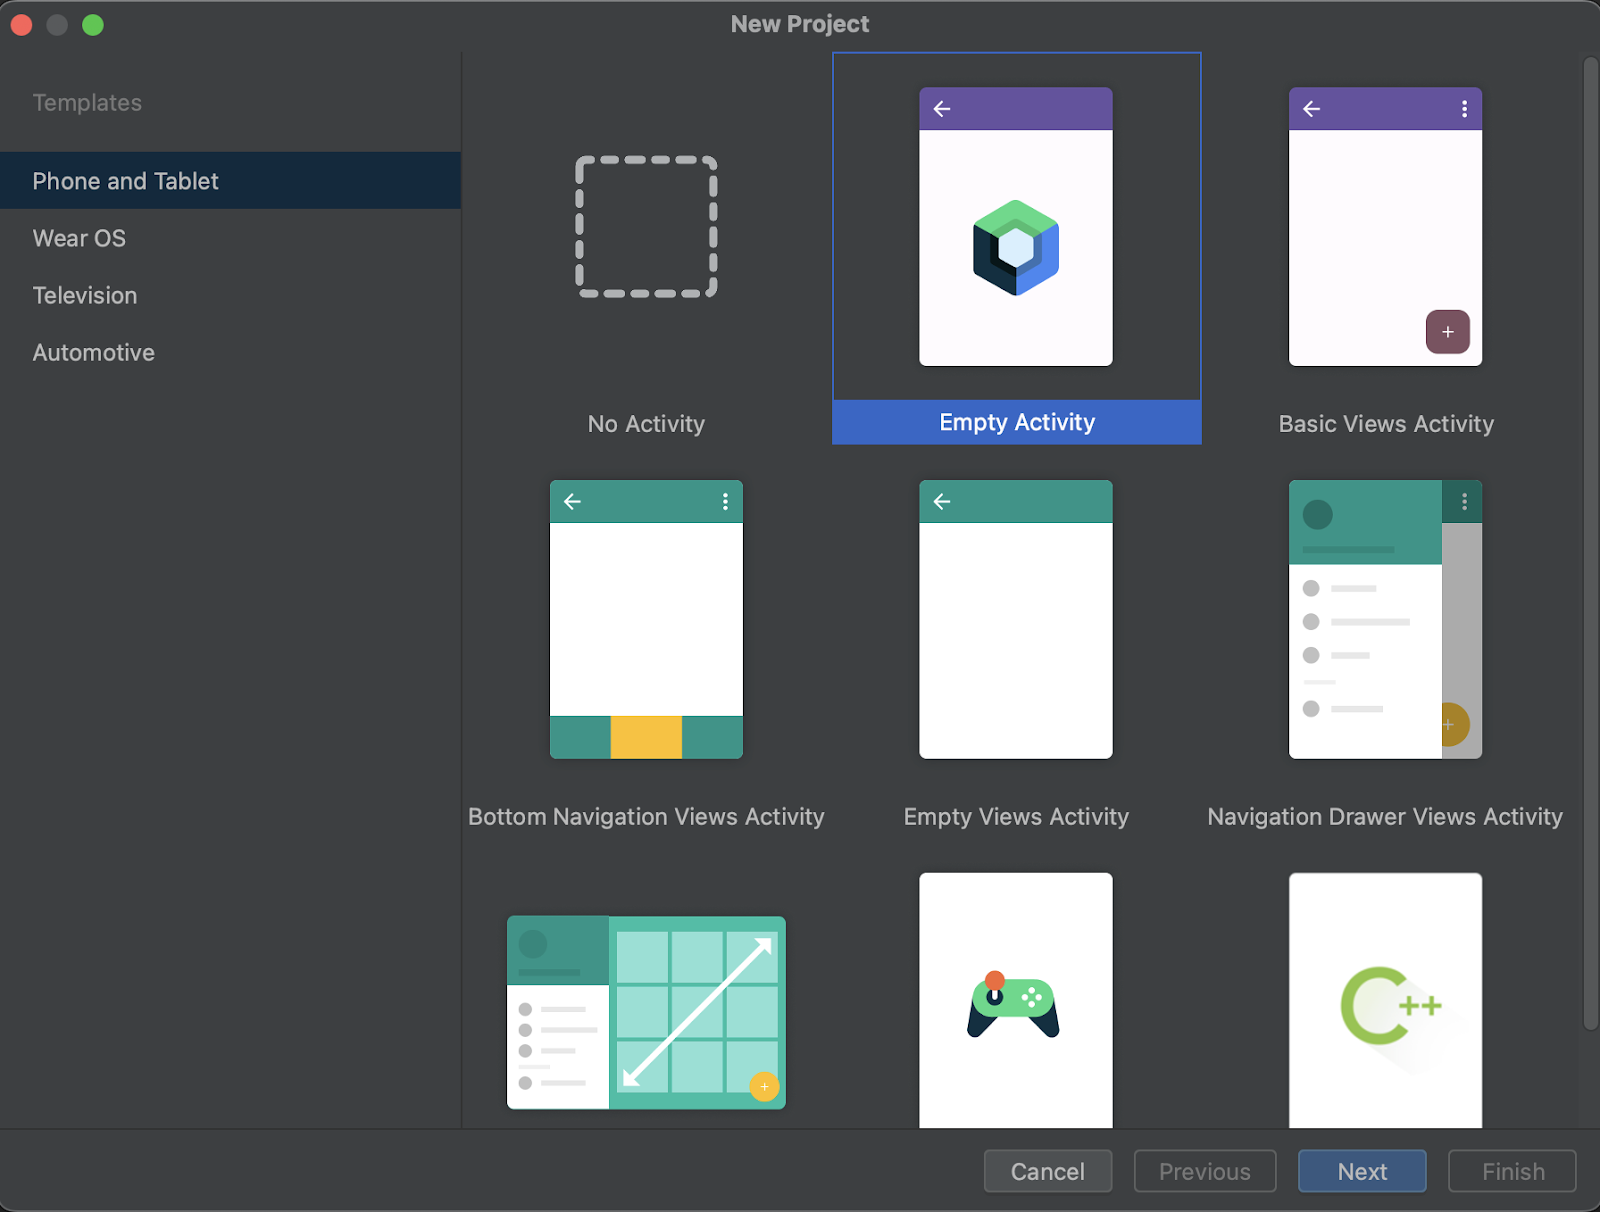
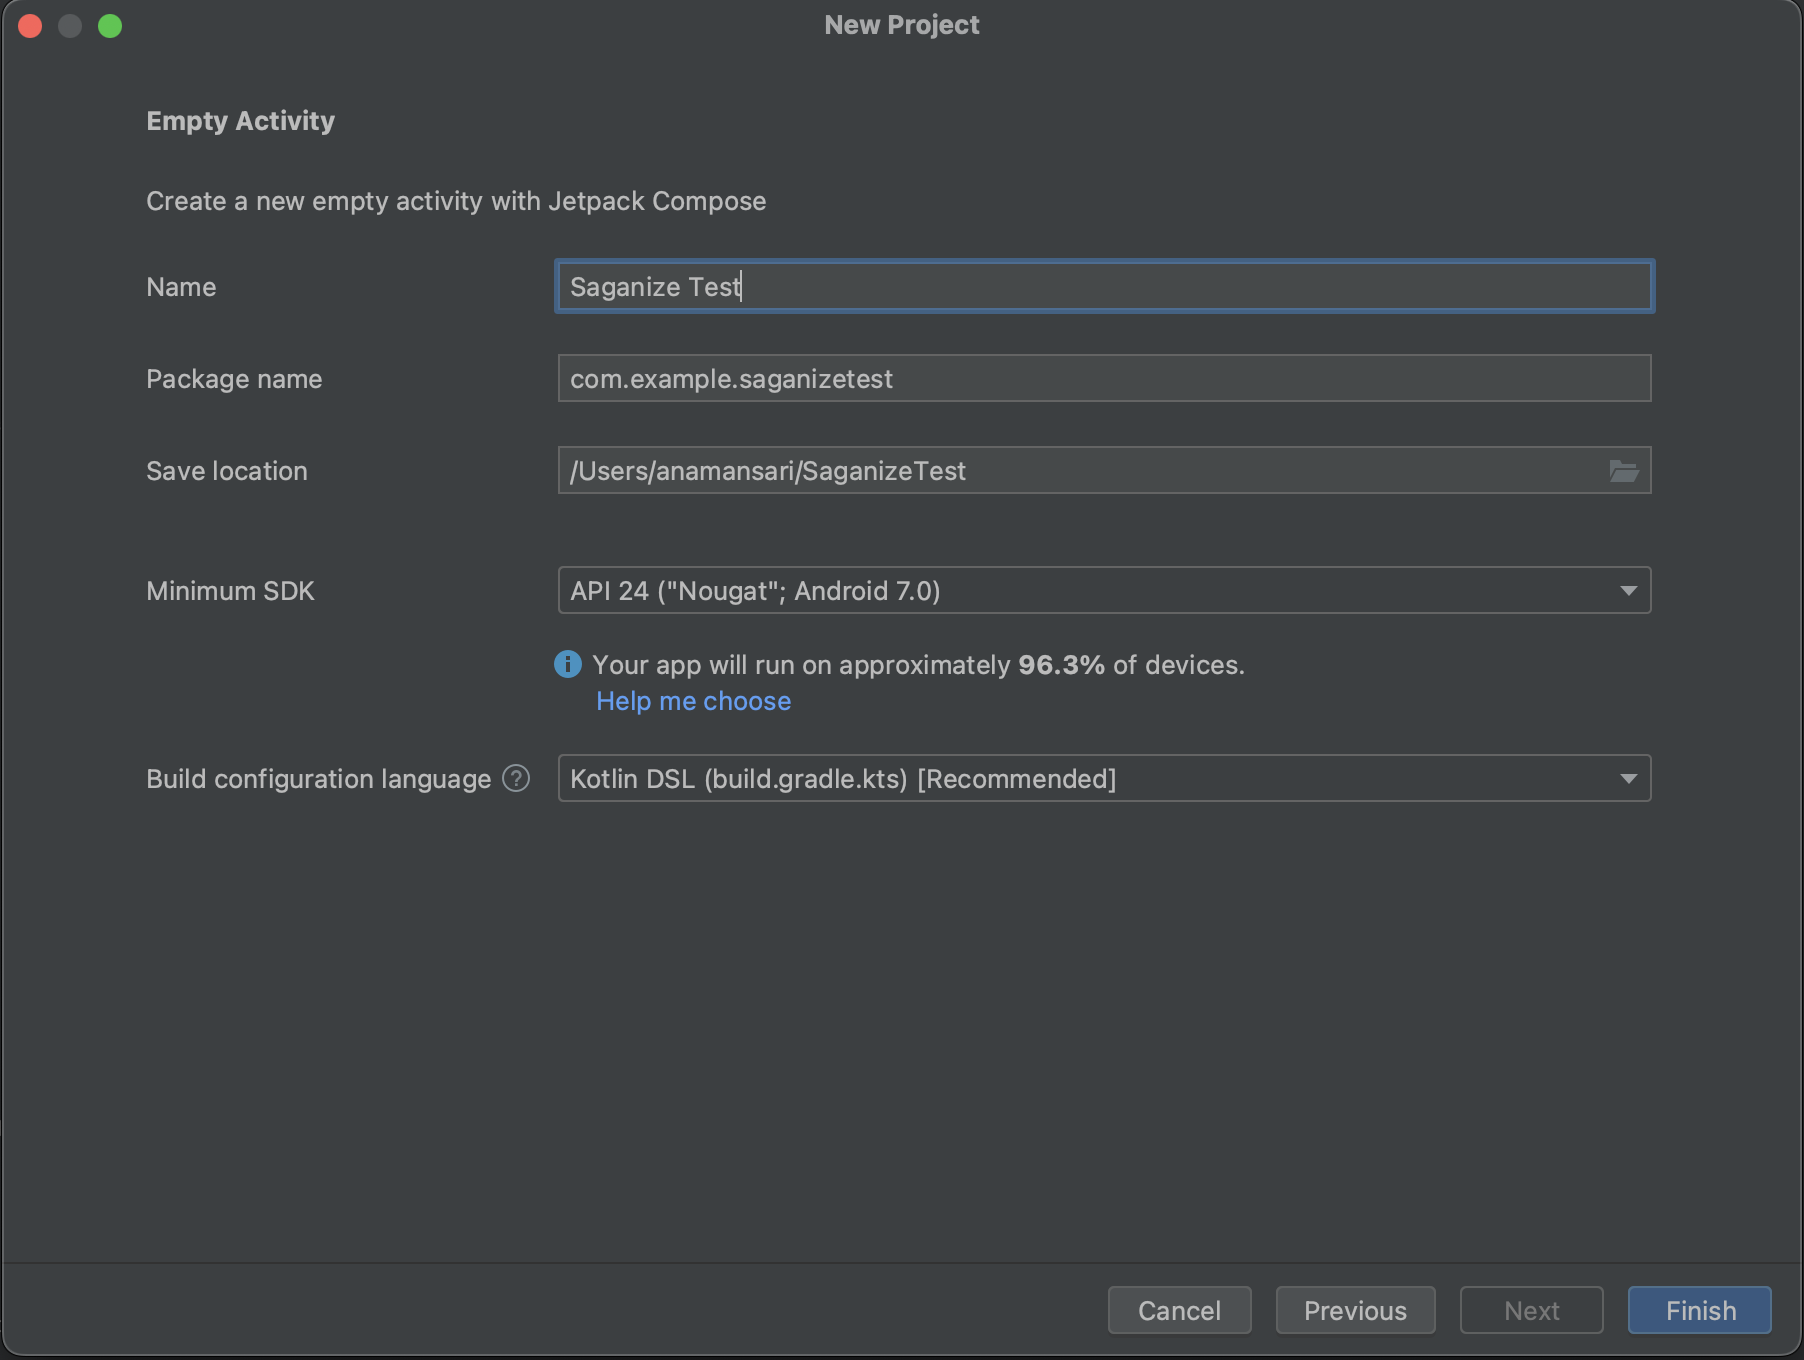
Open Android Studio and create a new project with an "Empty Activity."
Name your application "Saganize Test" and proceed.
Insert the
google-services.jsonfile into the root directory of your app module.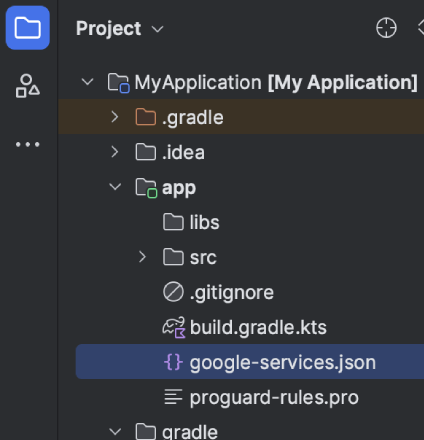
Import dependencies:
The library is available on JitPack.io. Add the JitPack repository to your build.
settings.gradle.ktsrepositories {
...
maven { url 'https://jitpack.io' }
}Add the necessary dependencies, including the Solwave SDK, Google Services libraries, Solana-KT, and DataStore. Solana-KT library will be just used to create a sample transaction object and DataStore will be used to save the PublicKey. Click on "Sync Now" after this.
build.gradle.kts (:saganizetest)plugins {
id("com.google.gms.google-services")
// ...
}Find out the latest version of Solwave-kt Library from here and replace it with
{version}in the following code.build.gradle.kts (:saganizetest)dependencies {
// Solwave SDK
implementation("com.github.Saganize:Solwave-kt:{version}")
// Add the Google services Gradle plugin
implementation(platform("com.google.firebase:firebase-bom:32.3.1"))
// solana-kt for creating sample transaction
implementation("com.github.metaplex-foundation:SolanaKT:2.1.0")
// data store
implementation("androidx.datastore:datastore-preferences:1.1.0-alpha04")
// ...
}
Integration
Datastore
Create a new class,
DataStoreRepository.kt, to securely save the PublicKey of the user. It's a recommended practice, but developers have flexibility in choosing their storage method.DataStoreRepository.ktpackage com.example.saganizetest
import android.content.Context
import androidx.datastore.core.DataStore
import androidx.datastore.preferences.core.Preferences
import androidx.datastore.preferences.core.edit
import androidx.datastore.preferences.core.stringPreferencesKey
import androidx.datastore.preferences.preferencesDataStore
import kotlinx.coroutines.flow.firstOrNull
import kotlinx.coroutines.runBlocking
class DataStoreRepository(private val context: Context) {
companion object {
val Context.dataStore: DataStore<Preferences> by preferencesDataStore(name = "datastore")
val KEY_STRING = stringPreferencesKey("wallet_key")
}
fun savePublicKey(value: String) {
return runBlocking {
context.dataStore.edit { preferences ->
preferences[KEY_STRING] = value
}
}
}
fun getPublicKey(): String {
return runBlocking {
val preferences = context.dataStore.data.firstOrNull()
preferences?.get(KEY_STRING) ?: ""
}
}
}Solwave Object
Create instances of DataStoreRepository and the Solwave object inside your
MainActivity.kt. The Solwave object requires anAPI_KEYfrom the Dashboard (make sure to use good practises to hideAPI_KEY)MainActivity.ktclass MainActivity : ComponentActivity() {
override fun onCreate(savedInstanceState: Bundle?) {
super.onCreate(savedInstanceState)
val datastore = DataStoreRepository(this)
setContent {
SaganizeTestTheme {
// A surface container using the 'background' color from the theme
Surface(
modifier = Modifier.fillMaxSize(),
color = MaterialTheme.colorScheme.background
) {
val context = LocalContext.current
val solwave = Solwave(context, apiKey = API_KEY)
// ...
}
}
}
}
}Pre-requiste stuff
Retrieve the PublicKey using DataStore and generate a sample transaction object for later use. Notice that the transaction object only requires instructions, no need to add a Blockhash.
MainActivity.ktsetContent {
SaganizeTestTheme {
// A surface container using the 'background' color from the theme
Surface(
modifier = Modifier.fillMaxSize(),
color = MaterialTheme.colorScheme.background
) {
// ...
var publicKey by remember {
mutableStateOf("")
}
publicKey = datastore.getPublicKey()
val solTransferInstruction = SystemProgram.transfer(
PublicKey(publicKey),
PublicKey("Bu3mTU2X7SoZUkyNU37jispVqRLkSSwiQuN6rGbvQx9f"),
10000L,
)
val transaction = Transaction().addInstruction(solTransferInstruction)
// ...
}
}
}User Interface Implementation
We will create two buttons separated by the Spacer. This buttons will handle the two functions of the Solwave SDK.
MainActivity.ktColumn(
Modifier.fillMaxSize(),
verticalArrangement = Arrangement.Center,
horizontalAlignment = Alignment.CenterHorizontally
) {
Button(
onClick = {},
) {
Text(text = "Select Wallet")
}
Spacer(modifier = Modifier.size(40.dp))
Button(
onClick = {},
enabled = publicKey.isNotBlank()
) {
Text(text = "Start payment")
}
}Select Wallet
Implement the
SelectWalletfunction inside the first button. It's a straightforward process that returns either Success or Error. On success, you receive the user's PublicKey, which can be saved or used as needed.MainActivity.ktButton(
onClick = {
solwave.selectWallet(
onSuccess = { walletKey ->
Log.d(TAG, walletKey)
// Saving the PublicKey
datastore.savePublicKey(walletKey)
publicKey = walletKey
},
onFailure = { error ->
Log.d(TAG, error.message)
}
)
}
) {
Text(text = "Select Wallet")
}Send Transaction
Implement the
SendTransactionfunction, passing the previously created transaction object. This function opens a bottom sheet for transaction signing and sending, returning the signature or an error in case of failure.MainActivity.ktButton(
onClick = {
solwave.performTransaction(
transaction = transaction,
onSuccess = { transactionId ->
Log.d(TAG, transactionId)
},
onFailure = { error ->
Log.d(TAG, error.message)
}
)
},
enabled = publicKey.isNotBlank()
) {
Text(text = "Start payment")
}
Alright, we are done! This is how easy it is to set up the Solwave Kotlin SDK. For a complete sample app implementation, check out the Saganize Sample App on GitHub
That's it! Discover the simplicity of integrating the Solwave Kotlin SDK into your Android app. Happy coding!